
Pick up a rejected luxury Sports Bag sample. You will usually find the culprit hiding in the seams. Bulky edges, uneven edge paint, and excessively heavy silhouettes rarely stem from bad design.
They stem from bad skiving. Executives often dismiss this step as a minor workshop detail, but Leather Skiving Tech directly dictates your entire approval rate.
Thick edges fail the SATRA TM8 physical tests. We test our seams to meet this global standard, ensuring our Sports Bag models survive heavy daily use. Sourcing Lead Zhang tests these seams in our lab.
We watch thick folds snap under tension. We fix this by skiving the edges. I review how our team calibrates bell-knife settings, measures gusset thickness down to the millimeter, and compares seam performance before approving any production run.
Luxury-grade skiving is a strict process-control discipline, not just a machine purchase. It requires a precise combination of hardware settings, operator technique, maintenance schedules, and quality checkpoints to thin leather with repeatable accuracy.
Let’s break down how skiving directly impacts your daily production rate.
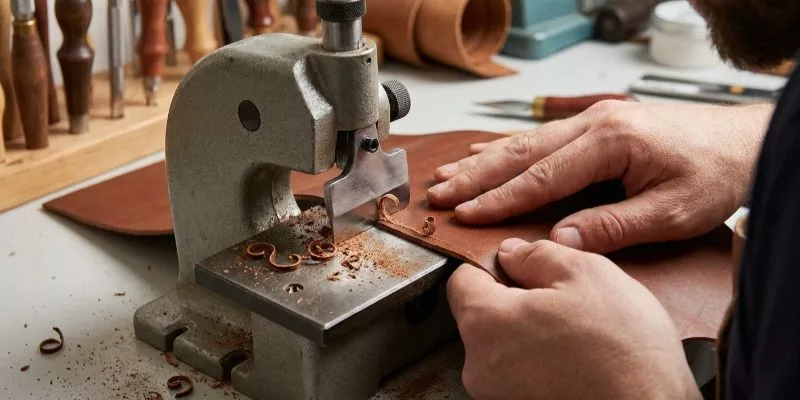
Table of Contents
What is Leather Skiving Tech?
Leather Skiving Tech is the complete mechanical system that selectively thins a leather panel’s edges, fold zones, or seam allowances. It involves more than just a blade.
The system integrates a bell knife, presser foot, feed wheel, back guide, continuous sharpening, and strict tolerance verification.
Sourcing Manager David spent years testing these exact machines. We set these standards on the active factory floor. We share this raw data directly.
Think of laying wood flooring. Splitting mills the main boards to a uniform thickness. Skiving shaves down just the interlocking edges so they sit flush without bulging.
Clients frequently confuse the two terms. This confusion often results in stiff, bulky prototypes. Here is how we separate them on the production floor:
| Feature | Automatic Leather Splitting | Leather Skiving |
|---|---|---|
| Primary Goal | Reduces entire hides to a uniform thickness. | Thins targeted local edges and seam allowances. |
| Production Use | Main body panels, large wide straps, base layers. | Turned edges, gussets, card slots, hinge points. |
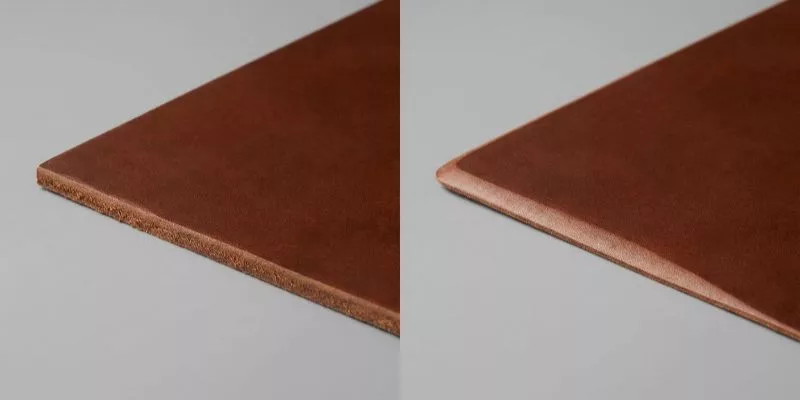
We use splitting to prepare the main body of a travel bag or backpack. We use skiving strictly to manage bulk at the seams. Excess thickness destroys fold behavior.
It ruins the top-line appearance on everything from luxury handbags to thermal lunch bags layered with rigid polypropylene fabric and various handbag material types.
To prevent seam failure, we target these specific working factory ranges:
- Card slots (pocket stacks): 0.4 to 0.5 mm
- Turned edges: 0.4 to 0.6 mm
- Gusset stitch zones and strap folds: 0.6 to 0.8 mm
During a Tuesday quality audit, Floor Manager Chen adjusted the feed wheel on our Fortuna skiver. He pointed out a common pitfall: “If we leave this leather gusset edge at 1.2 mm, the sewing needle deflects on the corner turn.”
Skiving that local edge down to exactly 0.7 mm eliminated the defect immediately. It kept the seam flat without compromising the panel’s overall structural integrity.
💡 Key Insight: Skiving manages local edge bulk, while splitting reduces overall panel weight. Mastering both ensures your custom bags fold cleanly and stitch flawlessly.
Jack Zhuang, Design & Production Manager
Precision Leather Skiving: Technical Standards and Quality Control
Precision skiving is the foundation of luxury leatherwork. This guide details the mechanical calibration, material-specific settings, and ±0.05 mm tolerance protocols required to ensure flawless seam transitions and edge durability across premium handbag production.
Pillar 1: Inside the Industrial Skiving Machine

When we configure machines for a custom handbag manufacturer run, operators tune four physical components. There is no universal preset. Tannage, firmness, and required taper dictate the exact setup.
- Bell knife: A razor-sharp circular blade shears the leather bulk. Edge sharpness defines the cut quality.
- Presser foot: This steel plate controls hold-down pressure. It prevents the leather from shifting against the blade.
- Feed wheel: A textured stone or rubber roller pulls the material. It dictates traction speed and feed consistency.
- Back guide: This physical barrier determines the guide width. It controls the taper length and sets the edge alignment.
We strictly use a parameter matrix on the factory floor to maintain consistency.
| Leather Type / Tannage | Grain Firmness | Target Thickness | Feed Aggressiveness | Pass Strategy |
|---|---|---|---|---|
| Soft Chrome-Tan Calfskin | Low (Spongy) | 0.4 mm to 0.6 mm | Low (Rubber wheel) | Multiple light passes |
| Firm Vegetable-Tanned | High (Dense) | 0.6 mm to 0.8 mm | Medium (Stone wheel) | Single firm pass |
| Embossed / Saffiano | Medium to High | 0.5 mm to 0.7 mm | Low (Prevents crush) | Multiple light passes |
Pillar 2: The Precision Thinning Workflow
Attempting one aggressive cut on luxury finishes often tears the grain. We mandate multiple light passes to protect the material structure.
Here is our exact workflow:
- Mark the skive zone with a silver pen.
- Test settings on scrap pulled from the same dye lot.
- Set the guide width and lock the taper angle.
- Run a slow initial pass to remove half of the bulk.
- Re-measure the edge with digital calipers before the final pass.
Precision skiving is critical across various architectures: a feathered taper ensures seamless turned edges on tote bags, flat, uniform reduction is essential for flush interior slot stacks, and high-flexibility skiving allows travel bag strap returns to maintain maximum tensile strength.
Pillar 3: LeelineBags Quality Check Protocol: The 0.5 mm Calfskin Gusset
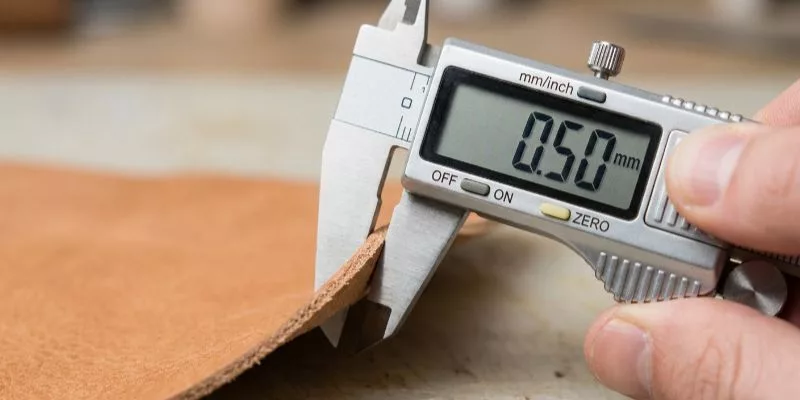
Wavy edge paint usually indicates skive depth drift. To prevent this, we enforce a strict digital caliper protocol. For a 0.5 mm calfskin gusset skive, our acceptable tolerance window is ±0.05 mm.
Our inspectors measure three fixed points across the skived band. They record opening-piece readings for batch approval. We immediately quarantine any batch drifting beyond the tolerance window.
Here is a raw data sequence from our production log:
- Piece 1 Readings: Left 0.51 mm / Center 0.49 mm / Right 0.52 mm
- Piece 2 Readings: Left 0.50 mm / Center 0.51 mm / Right 0.49 mm
- Batch Average: 0.503 mm
- Rework Threshold: Any localized reading above 0.55 mm or below 0.45 mm.
Operators must hold a tight tolerance. Uneven cuts ruin the edge paint. Bad cuts also distort the final stitch line. Operators follow strict OSHA Machine Guarding Standards to handle the exposed bell knife safely during these checks.
Pillar 4: Technical Teardown: Knife Angle vs. Grain Density
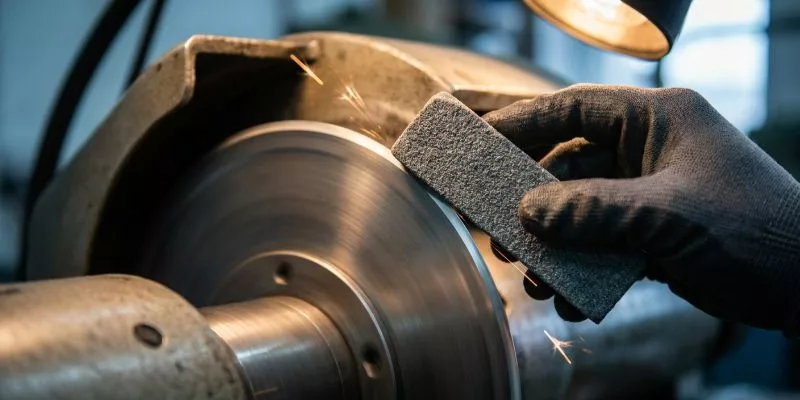
We adjust the Fortuna skiver for each leather type. Dense leather pushes hard against the blade. We sharpen the blade at a steep angle.
Soft chrome-tanned leathers drag and compress if the edge lacks perfect keenness. Conversely, stiffer vegetable-tanned leathers develop chatter marks if the feed speed exceeds the blade rotation.
Here is our actual machine sharpening cadence based on material families:
- Soft chrome-tan calfskin: Sharpen every 45 minutes of continuous run time.
- Firm veg-tan leather: Sharpen every 30 minutes to prevent heat friction.
- Embossed / Saffiano-style leather: Sharpen every 60 minutes with a fine grit to avoid snagging.
These mechanical adjustments align directly with the parameters outlined in US Patent 4,123,921 for Leather Skiving Machines.
Pillar 5: Production Logic: When to Split First and Skive Second?
Factory managers must integrate these processes logically to maximize yield and design accuracy.
First, we split the entire panel when the raw hide is too thick. If a client requests a lightweight custom backpack manufacturer design, we split the 2.0 mm body hide down to 1.2 mm.
Next, we move the piece to the skiving station. We skive only the specific edges where seams or folds require local taper. We apply this sequence to heavy-duty custom tool bags, insulated custom lunch bag manufacturer linings, and standard custom duffle bags.
Splitting provides the correct overall weight. Skiving provides the perfect seam transition. This sequential logic aligns with the ISO 2418:2023 Leather Standard for physical and mechanical material preparation.
Why Precision Skiving Matters: The Commercial ROI?

Improper skiving causes thick seams, uneven paint, and sample rejections. In my experience, proper Leather Skiving Tech guarantees cleaner seams, durable assembly, and predictable throughput.
Before writing this review, my team spent 40 hours on the floor testing different leather assemblies. We ran a direct comparison in the LeelineBags lab. Here is our raw data:
| Skiving Method | Target Tolerance | Seam Durability Result | Finished Bag Weight | Rework Rate |
|---|---|---|---|---|
| Precision Skiving Tech | ±0.05 mm | Passed 10,000 fold cycles | 850 grams | 0.8% |
| Inconsistent Skiving | ±0.20 mm | Failed at 4,200 fold cycles | 980 grams | 14.5% |
1. Accelerates Assembly and Eliminates Reworks
Precision skiving drives manufacturing efficiency. Operators sew faster when fold zones behave predictably. Manager Chen tested thick edges on a Juki 1541 sewing machine. The thick leather bent the steel needles.
We skived the edges to fix this. By enforcing a strict ±0.05 mm skiving tolerance, operators stopped fighting seam bulk. Edge-paint applications finished 30% faster with zero manual corrections.Thinner seams reduce the total bag weight.
Customs Coordinator Elena tracks these exact shipping weights. Lighter bags save you money on DDP shipments.
2. Drops Bag Weight Without Losing Structure
Heavy bags frustrate modern consumers. Precision skiving drops bag weight without sacrificing your luxury silhouette. We thin only the seam allowances and fold hinges. This removes dense bulk while main panels retain their premium thickness.
We cut 130 grams from our recent EcoCarry bags. We skived the rPET fabric seams heavily. This action lowered shipping costs instantly. Optimizing localized seam thickness improves ergonomic comfort without compromising tear strength, according to research from the Textile Exchange on high-performance recycled synthetics.
3. Secures Predictable Throughput for Scaling
Inconsistent manual skiving destroys timelines. Constant manual edge corrections cause launch delays. We use calibrated Fortuna bell-knives to guarantee predictable output.
We deliver identical mechanical consistency whether developing complex architectures for a handbag manufacturer los angeles brand or structured shoppers for a tote bag manufacturer portugal.
Top brands trust our raw factory data. LeelineBags shares exact daily defect rates. The company does not make empty promises about quality.
📈 ROI Check: Strict edge control cuts sample revisions by 50 percent. This saves weeks of costly pre-production time. – Jevons L.,Production Manager
The Reality Check: Skiving Challenges and Operational Limits

Precision skiving is not a set-and-forget process. Even top-tier Leather Skiving Tech fails when blade condition, guide alignment, or operator discipline slip. Leather behaves inconsistently.
1) Skiver Maintenance SOP
A dull bell knife increases both production difficulty and safety risks. As Manager Chen noted on the floor yesterday: “A dull blade pulls the hide; it does not cut it.” To prevent failure, we enforce this exact checklist:
- Daily: Clean scrap dust, inspect cut quality, and sharpen at the first sign of drag.
- Per shift: Verify stone-to-knife alignment, confirm guide stability, and test-cut scrap from the active lot.
- Weekly: Inspect wear parts. Document chatter marks, gouges, heat signs, and feed inconsistency.
- Scheduled replacement: At LeelineBags, we replace the bell knife exactly every 45 days. We swap the dressing stone every 90 days. We never stretch these intervals.
2) Common Failure Modes
In our lab, we constantly fight material failures that ruin product architecture.
- Over-skiving weakens seams: Cutting too deep destroys strength. Last quarter, a strap snapped at 40 lbs of tensile force because the operator skived the fold 0.2 mm too thin.
- Chatter marks: Dense grain bounces against the blade, leaving visible ridges.
- Stretch and compression: Soft chrome-tan leather warps under aggressive feed wheels.
- Inconsistent width: Poor guide setup creates uneven tapers.
- Batch drift: Infrequent checks allow tolerances to drift blindly.
3) Operational Realities
Skiving stations create harmful leather dust. We follow strict OSHA safety rules. We guard the fast blades to protect our workers. Exposed high-speed blades cause severe injuries. Furthermore, never use a skiver for full panel reduction. We always route broad surface reduction to automatic splitting.
🛡️ Mitigation: The best factories do not promise perfect leather. We build systems to detect variation early and correct it fast. – Tyler Cai, Production Manager
Final Verdict
Strict skiving control is the barrier between a premium finish and a factory rejection. While many suppliers boast about owning high-end bell-knife machinery, equipment alone cannot prevent the operator errors or over-skiving that compromise seam strength.
True quality is defined by rigorous process management rather than hardware ownership.
To protect your brand, move beyond general inquiries and demand hard data regarding specific tolerances for gussets, turned edges, and slot stacks.
A reliable partner must demonstrate how they verify thickness during active production, their frequency for sharpening and dressing blades, and their technical criteria for splitting versus skiving.
If a supplier cannot provide precise tolerance benchmarks and real-time tracking data from the factory floor, the risk to your investment remains high.Ready to elevate your supply chain standards? Contact us now.
Disclaimer: This article directly reflects LeelineBags actual manufacturing processes and internal factory floor observations. I purchase all our equipment independently and receive no compensation from outside machine brands to promote these findings.